Assignment
mavingpb@goshen.edu
|
||
| FLASH
Assignment |
© Marvin Bartel, 1992, 1997, 1998 | Copyright notice: Goshen College
students are authorized to print a copy for their own use. NO part of this
document is may be published, NO class use (other than at Goshen College),
and NO reproduction electronically or otherwise is permitted without the
authorization by the author. For permission and authorization, please contact:
mavingpb@goshen.edu |
Described by some photographers as their, "portable sun," the strobe, invented by Harold E. Edgerton of M.I.T. in the early 1930s, has been a boon to photography in low light and fast motion situations. On the negative side, a flash produces unnatural lighting, flattened faces, harsh shadows, and other problems. The two purposes of this assignment are to learn how to get both the correct amounts of light an to get beautiful expressive lighting using a flash.
Make at least one small comparison print from each of 5 ways of lighting with a strobe. Print your best negative as large as possible on 8 x 10 paper (using best cropping) and mount it.
To use a flash you should understand how it gets the exposure correct. Read this whole assignment before beginning. Inquire about any aspects you find puzzling before working. Do not be timid about asking. Good negatives are worth it.
See pages 236-244 in Upton & London, 6th ed. Study equipment manuals for the camera and strobe you are using, especially for the Vivitar 283. See pages 138 to 141 in Langford's Master Guide to Photography (available in library reference room and in room VA22).
2. Flash is much brighter near the strobe and very quickly gets less intense farther away from the camera. Natural light is usually evenly distributed, and except for direct sunlight, it is diffused for soft tonal modeling and subtle shadows.
3. Strong shadows can distract in strobe photos.
4. Reflective surfaces can create distracting glare in the photograph.
The strobe contains a capacitor which builds up and stores a powerful charge of electric current which is released to produce a powerful but very short burst of light.
Depending on your equipment, you could have up to 3 modes to get correct exposure. They are manual, automatic, and dedicated.
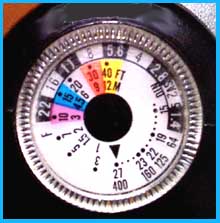
1. All removable strobes (flash attachments) allow "manual" or "M" mode. In this mode the full burst of light is released every time. Each distance (between strobe and subject) requires a different f-stop (lens setting) when using the flash set to manual. Follow the chart on the strobe and set the f-stop to match the distance shown on your lens after you have focused on the subject. The chart assumes you are pointing the flash at the subject (not bouncing). Be aware of your film ASA before you read the chart on the flash.
2. Most strobes also allow "Automatic" or "A" or "AUTO" mode. When set to AUTO mode set your lens f-stop according to the chart recommendation for the color setting and do NOT change your f-stop for each distance. The duration of the flash is automatically determined for each distance. A small sensor switches off the flash in a microsecond as soon as it senses enough light. Be sure the ASA has been correctly set on the chart on the flash.
Most units give more than one choice (colors) of f-stops. The choices are meant to allow depth of field options. The color is either set on the front by turning the sensor or by sliding a switch on the back (depending on the model). Change the camera's f-stop only when changing color (otherwise exposure will by wrong). Most strobes have a green confirmation light, which comes on for a moment after each flash. USE IT before taking the picture to make sure you have enough power. The flash has a test button for this purpose. Wait to take a photograph until a test flash indicates enough light.
3. Many modern strobes also have a "dedicated" or TTL (through the
lens) setting. These are camera-brand-specific strobes. They have a special
mount designed for your camera brand. Your camera's flash mount must have
at least three electric contacts in order to allow a TTL strobe to function.
TTL determines the duration of the flash, using the camera meter
during the actual exposure by using TTL metering. TTL strobes also offer
a confirmation signal light, but firing the flash with out taking a picture
may not be possible in this setting. Any f-stop within the range of the
flash may be used. If it does not confirm, you need to take the picture
again with a larger aperture.
|
|
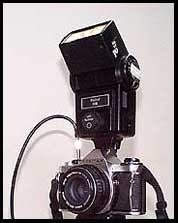
SLR cameras, as most of us use in class, have only one correct shutter speed for flash. Accidentally using a faster shutter speed will produce negatives with only one part properly exposed. Focal plane (located at the film) shutters have two curtains which follow each other. At higher speeds the second curtain begins to cover the film before the first curtain has totally opened. Hence, there is no chance for the strobe to expose the whole frame at once.
All 35-mm cameras will work at 1/60th of a second or slower. Slower
speeds could cause camera motion blur if there is some other light present.
A few have faster speeds. Most cameras have the flash synchronization speed
marked with an "x", a lightning symbol, or a red number. See your camera
manual or ask.
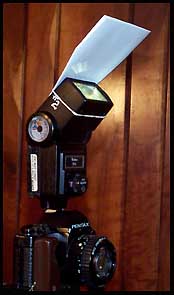
![]() Shutter speed
(flash sync speed) (1/60th on most cameras)
Shutter speed
(flash sync speed) (1/60th on most cameras)
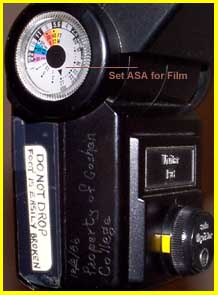
![]() ASA setting
on the flash (same as film speed)
ASA setting
on the flash (same as film speed)
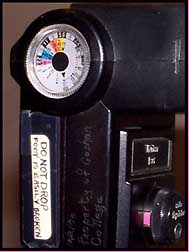
![]() Mode setting
(manual, auto, dedicated)
Mode setting
(manual, auto, dedicated)
![]() Flash color
setting (if auto). In the photo above the Yellow
provides good power for bouncing.
Flash color
setting (if auto). In the photo above the Yellow
provides good power for bouncing.
![]() F-stop (from
the color - if using Auto setting)
F-stop (from
the color - if using Auto setting)
![]() Whether or
not flash confirmed (green signal light)
Whether or
not flash confirmed (green signal light)
![]() How flash
was aimed (straight or bounced from ceiling or wall)? Diagram it
How flash
was aimed (straight or bounced from ceiling or wall)? Diagram it
![]() Description
to identify the picture
Description
to identify the picture
Ask a friend to model. Make portraits. You may want to include objects or settings, which add meaning to the portrait. Some portraits have the subject holding on object that adds identity to the portrait. You may want to avoid all distractions and go for extreme simplicity. A common problem is to pose models too tightly against the wall behind them. Unpleasant shadows and background textures distract.
The Assignment is produce Five
Kinds of exposures and compare them with each other.
straight
flash ceiling bounce ceiling
bounce with fill card
wall
bounce with fill card flash off the camera
 |
 |
2. Ceiling bounce. Tilt the strobe head up to a point on the ceiling exactly half way between the camera and the face of the model. The ceiling should be white and not too high.
Unfortunately, if using the Vivitar 283 or 285, the recommended automatic f-stop setting will underexpose when bouncing. Correct for this by setting your aperture one stop farther open whenever using it as a bounce flash.
Example: If it calls for f-5.6, set it at f-4.
Always test to see if the confirmation
green light comes on. If the green light does not come on, change to
a color requiring a larger aperture (smaller f-stop number). Also see "auto
mode," above. It helps to use the tele setting (even with a wide-angle
lens) when bouncing if the flash has it (as on
the Vivitar 285).
 |
3. Ceiling bounce plus white card. This is the same as ceiling
bounce, but attach a flat white 3 x 5 card (or something similar) to the
top surface of the flash head so that it will bounce some of the light
forward and partially fill shadows produced by the ceiling bounced light.
Use tape or a rubber band to attach the card. This should produce an effect
closer to outdoor natural light on an overcast day.
|
Note: Some bounce flash unit heads can not pivot to the side. When using a flash that only pivots up, turn the camera on its side to point the flash toward the wall.
Optionally, try another exposure in a narrow hallway or with a secondary reflector for fill light on the dark side of the face.
Off camera flash (select one of the options below).
Option 1. Double exposure. Pose the model where there is little or no background to catch the light such as an outdoor open area at night or in a room with a mat black wall such as Umble Center stage. In total darkness, using a tripod and cable release, lock open the shutter on the B setting. Point the off-camera strobe at the subject and trigger it manually. Ask the model to take a new position and fire the flash again. Be sure not to cover the light sensor on the front of the flash with your hand.
Option 2. Painting with light. Pose a model or still life objects.
A dark background is not needed. Darken the room and lock open the shutter
using the B setting and a cable release with camera on a tripod. Fire the
flash 4 times from various angles depending on how you want the subject
illuminated. Typically 4 flashes will be the same as doubling the
intensity twice. Therefore use an f-stop which cuts the light in
half twice (two stops smaller aperture). This assumes you are using the
flash from a distance of 5 or more feet and that it is set to automatic.
Do not cover the flash's light sensor with your hand. The confirmation
light should come on after each flash.