GET LOGGER PRO
The links below will work until February 2019.
Windows 10, 8.1, 7
Logger Pro 3.14.1
www.vernier.com/d/o4jgt
macOS 10.12, 10.11, 10.10
Logger Pro 3.14.1
www.vernier.com/d/poty3
Instructions: Click a link above to download the right installation file for your computer. Then double-click the file to install the software.
Logger Pro
We'll use "Logger Pro" to analyze our video. (And later on in the course, to analyze radiation measurements).
Logger Pro is available on all GC Lab computers (such as in SC 008), and may be downloaded for free for use by GC students (see links at left).
Analyzing video with Logger Pro
Using Logger Pro, you can:
- Read in a video,
- Mark the positions of some moving object on the screen, frame-by-frame,
- Mark the length (in 'real life') of some object of known length, to convert to real life units,
- Rotate the $x$-$y$ axes so that one axis is parallel to the motion.
After doing this, Logger Pro will produce graphs of motion and speed as functions of time. You can also *fit* the graphs to simple functions, to find things like average slopes, average speed, average acceleration, and more.
Read in a video
Let's assume that you've already e-mailed yourself a copy of your movie from your iPad, or put the movie on Google Drive from your iPad.
Save your movie (from e-mail or from Google Drive) to the desktop of your computer, which has Logger Pro.
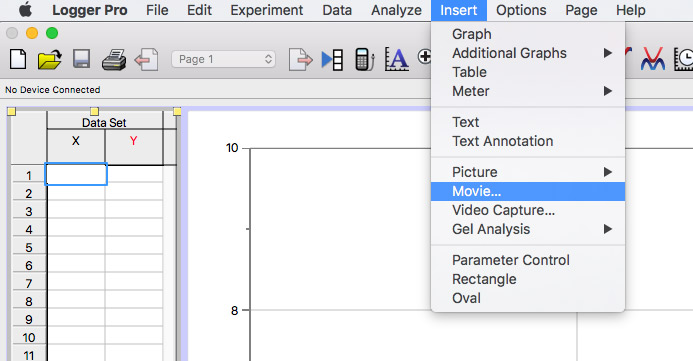
Open up "Logger Pro" from the Start menu, or from the Launcher. You'll see cells, like in a spreadsheet and some other things.
Choose "Insert | Movie" and select the movie file.
Mark up a moving object
 On the right bottom side of the movie frame, press the button that looks like this to enable video analysis.
 To the right of the movie frame, you'll see several buttons.
This one is the Add (a point) button.
To the right of the movie frame, you'll see several buttons.
This one is the Add (a point) button.
 Advance the movie until the point just after you release the falling object. Move the cross hairs of the Add a point pointer over top a part of your object and
click to mark it with a dot on the movie.
Advance the movie until the point just after you release the falling object. Move the cross hairs of the Add a point pointer over top a part of your object and
click to mark it with a dot on the movie.
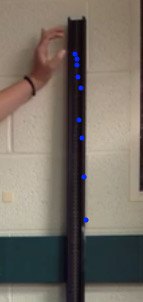 Each time you click to add a point, the movie is advanced by one frame, so you can click on the position of the object in the next frame, and keep going. Before long, you've marked the
trajectory of the falling object, and the computer knows the on-screen position and time of each blue dot.
Each time you click to add a point, the movie is advanced by one frame, so you can click on the position of the object in the next frame, and keep going. Before long, you've marked the
trajectory of the falling object, and the computer knows the on-screen position and time of each blue dot.
If you get  one point wildly off, you can click the "pointer" button, and grab a point with the mouse to move it to where you think it ought to be. Or, you can start completely over by selecting "Data | Clear all data".
Set length of a known object
 In Lab 1 you measured the on screen size of a person or of a meter stick. Use the Set Scale button to do that in Logger Pro.
 After you click it, you'll move the cross hair on the screen to one end of your
object. Hold the mouse button down and drag it to the other end. A green line will show up, and a menu asks you how long the object that you've marked is in real life.
After you click it, you'll move the cross hair on the screen to one end of your
object. Hold the mouse button down and drag it to the other end. A green line will show up, and a menu asks you how long the object that you've marked is in real life.
Origin, and orientation of axes
 Finally, use the Set origin button.
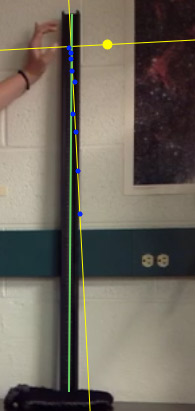 After you click it, move the pointer to the first point that you marked on the movie and click the mouse button to set the origin of your
coordinate system. Make sure the points you marked are running along the x-axis (or the y-axis): You can grab the yellow dot, a little ways from the origin, and rotate the coordinate axes until the points are running along one of the axes.
After you click it, move the pointer to the first point that you marked on the movie and click the mouse button to set the origin of your
coordinate system. Make sure the points you marked are running along the x-axis (or the y-axis): You can grab the yellow dot, a little ways from the origin, and rotate the coordinate axes until the points are running along one of the axes.
Select Distance and Velocity graphs
You'll see areas on the screen that contain a graph, and another area that contains data (in what looks like a spreadsheet).
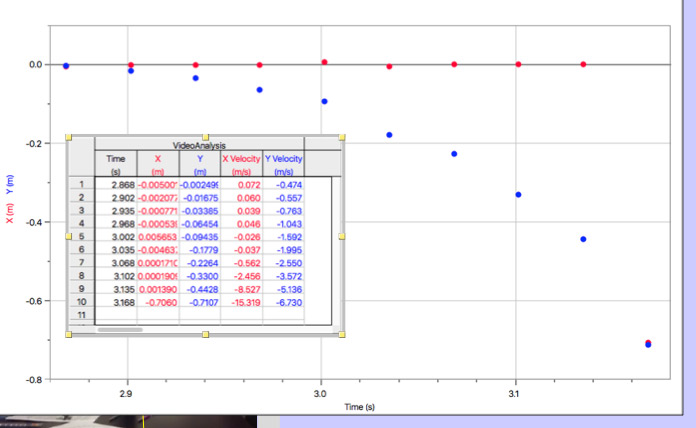
One of those data sets (X or Y) has the data you want (the vertical position) and the other is the horizontal position (Which we don't care about: mostly re seeing the jitter in how you mark the object).
If you click in the left side of the graph--where it says Y (m) X (m) on my picture--you can select just the data you want to display (for example, the Y data).
If I had wanted to see a velocity vs time graph instead of position, I would have selected Y Velocity (m/s) instead.
LOGGER PRO - Downloading and installing
Here are links to download LoggerPro. After the file has downloaded to your computer, double-click the file to install the software.
Here are more detailed instructions
The links below will work until February 2019.
Windows 10, 8.1, 7
Logger Pro 3.14.1
www.vernier.com/d/o4jgt
macOS 10.12, 10.11, 10.10
Logger Pro 3.14.1
www.vernier.com/d/poty3
FOR OLDER COMPUTERS
For Windows and Mac computers that are no longer receiving updates, you will need an older version of Logger Pro. If your version is not listed below, please contact us at support@vernier.com.
Windows XP and Vista
Password: climate
Mac OS X 10.9
Password: experiment
Mac OS X 10.8
Password: exploration
Mac OS X 10.7
Password: experiment
Mac OS X 10.6
Password: climate
These links are for the use of GC students only. Please do not share these links outside of Goshen College.