Notability
You can use Notability to combine pictures, text, drawing. It's a great tool to mark up graphs, and some of our assignments! It works with any pdf file as well.
Using Notability, you can do these things to a pdf:
- Insert empty pages into a pdf.
- Insert a "textbox" and type text anywhere.
- Use a pen tool to draw freehand anywhere. Or use it to draw and adjust straight lines to fit data...
- Insert pictures/photos from a file,
- Take a screenshot on your iPad--hold down together [home]+[power] buttons. Then insert the screenshot and crop it in Notability.
- Insert a photo that you take with your iPad.
Get Notability
 Notability is a paid app. But it is available to .edu institutions for free.
Is it already installed on your iPad?
Notability is a paid app. But it is available to .edu institutions for free.
Is it already installed on your iPad?
Using Notability
When you download a .pdf file on your iPad, you have the option to Open with Notability. Do that, and you'll be asked if you want to import the pdf into a new or existing note. (Choose 'new').
Here's how to open a pdf handout from our site, and edit it in Notability - Narrated 4 minutes.
Once in, you can move around within your pdf by dragging with two fingers. (Sometimes you can drag one finger to scroll, but watch out: If you're in drawing mode, you'll draw a line instead of scrolling around. The two-finger drag will scroll in all modes.)
Importing a web page into Notability
While viewing a web page in Safari, you can click on the share icon,  , then either:
- Find the Notability icon, and click on that (works with web pages that are not password protected), or
- Click on the markup icon,
 , and then "Import to Notability".
Typing notes / responses on your pdf file
You'll insert a textbox, type text, then move and/or format the text:
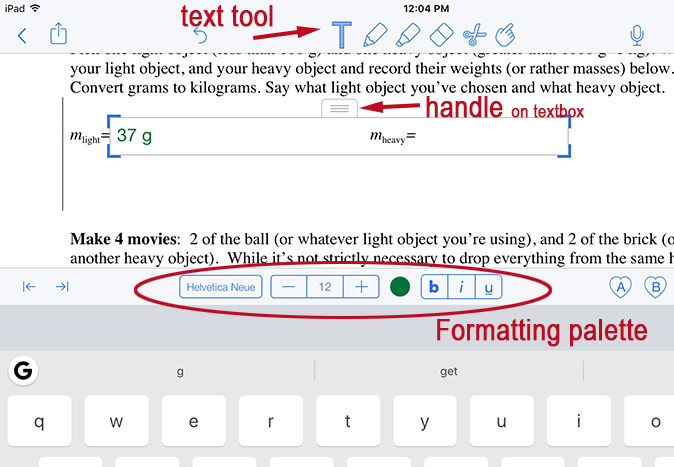
- Make sure the text tool is selected.
- Then you can tap anywhere in the pdf to insert a text box. Don't worry about tapping at exactly the right location, you can always move the text box later on.
- You'll see the formatting palette above the keyboard. You can select text characteristics before typing, or later, select the text and re-format it.
- Type and your text appears in the textbox.
- Grab the handle of the textbox to move it around.
- You can grab any corner of the textbox to re-size it.
Draw a straight line
- Tap the pencil icon to get in drawing mode
- Put your finger on the screen at one point on the line.
- Drag your finger away from that initial point. You'll draw a wavy (freehand) line, but keep your finger down a little longer and the line will change from a wavy one to a straight line!
- Now as you move your finger around you are moving the final point on your line segment. When you have it where you want it, lift off your finger.
Use the scissors tool...to modify a line
Once you've drawn a straight line, you can use the "scissors" tool to circle a line to "select" it. (Dragging the scissors around any part of the line is enough to select it.)
Once the line has been selected, you can use one finger to drag it around and move it to a different place. You can use two fingers to change the angle of the line. In this way you move a line around (like you would move a ruler) to fit some data points "by eye" with a trend line.
Add a page to your document
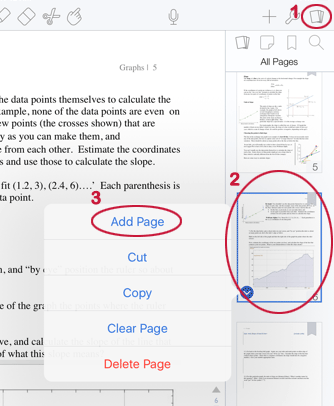
- Tap the pages icon at the far right to open the visual list of pages in your document.
- Tap the image of one of the pages in your document to select it.
- Tap the image of that page again, and a menu will show up that let's you "Add Page". A new, blank page will be added just *after* the page you've selected.
You can use a new page as a handy place to put a full size screenshot, or a snapshot of your calculations into your report.
Handing things in
Before you hand things in that you've edited / created in Notability, you'll set Notability up to backup its files to your Google drive. Once you've done that, there's a shorter way to hand things in:
Set up automatic backup
Watch the first 90 seconds of this video to find out how to set up Notability to automatically back up its notes to your Google Drive. (Choose the "PDF + Recording" option that Erin talks about).
Hand in a .pdf
Once you've got the automatic backup option set up, Notability will continuously update each file you've made or changed to a .pdf on your Google Drive. (Probably in a folder called "Notability"). So, to "hand in" a pdf on Moodle that you made in Notability:
Optional: Get Gboard
 If you aren't connecting a physical keyboard to your iPad typing can be slow.
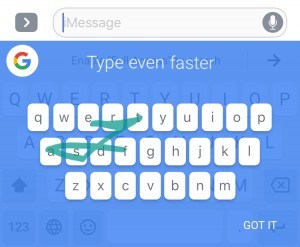
"Gboard" is an alternative, on-screen keyboard for the iPad (produced by Google) which enables you to do "glide typing":
For example, to type the word "faster" you put your finger down on f and then drag your finger tip through the letters a s t e r and lift off.
 Gboard is a free app. Install it from the App Store. After you've downloaded it, you'll need to change your Settings to allow it to work. Tap the app icon and you'll get instructions to follow.