Lab 05 - Rangefinders & Stepper motors
Pre-lab assignment
-
Rangefinder
 We will be using the SRF-05 Rangefinder. For more information, refer to the excellent page provided by the manufacturer:
Trigger pulse Assume the rangefinder has the trigger line connected to I/O line 3. To send the trigger pulse, you can use the technique you used in Lab 02 to turn a single pin high and low. But you'll want to use the
delayMicroseconds()function instead of the (milliseconds)delay()function.Consult the documentation to find the minimum trigger pulse width. (You will want to go a bit longer than the minimum to be sure and trigger.)
Echo pulse Assume the return (echo) pulse is connected to line 4. You'll need to figure out how long the return pulse is. Consult the documentation for the Arduino
pulseIn()function. Consult the rangefinder documentation about how to interpret its width.You will definitely want to use the
timeoutoption of thepulseIn()function.Write a program (and put it into our menu) that will- tell the SRF-05 to make a chirp,
- read the echo pulse to get the range to an object,
- calculate the distance in cm and
- display the distance on the LCD.
Make it operate continuously so the display changes as the object moves. Also, put a button check into it so you can return to the menu.
- Stepper motors
Two pages about Stepper Motors:
We will control stepper motors using the Tic Controllers from Pololu. These controllers integrate all the electronics to drive a stepper motor. You can control the Tic from the Arduino. But Pololu also makes a computer program / app to control them through a USB connection. The app turns out to be useful to try out the motors, and set operating defaults, like the motion speeds and accelerations.
- For the Arduino to access the motors through the Tic controller, you'll need to install the Tic Library. Within the Arduino IDE, use the library manager to search for "Tic Stepper"and install that library.
- The Wire Library comes with the IDE so you don't need to do anything
- At pololu.com you can download the Tic Software and Drivers for Windows (or Mac OS) and then install it on your computer.
At the beginning of your program you'll include code like this:
// I2C library used by Tic Controller
#include <Wire.h>

// Pololu Tic Stepper Controller library
#include <Tic.h>

// This creates an object called 'tic'
TicI2C tic;
You'll need to initialize some things in your
setup()section like this:void setup() { Wire.begin(); delay(20); // Define current motor position to be zero. tic.haltAndSetPosition(0);Then to move the motor we use lines like the following in the loop section or in a function that we write.
tic.setTargetPosition(400);   // go to this position
tic.setTargetVelocity(2000000);  // start turning at this velocity
tic.setTargetVelocity(0);   // stop
tic.setTargetVelocity(-2000000);  // turn the other way
tic.getCurrentPosition();  // returns the current position
Look at the code examples: Once you've installed the libraries, they are in the IDE when you go to File | Examples | Tic.
Write a program (and put it into our menu) to move the stepper using the buttons:
- when you press the up button the stepper moves forward some amount and the down button moves back the same amount. (a modest challenge)
OR
- Write a program without using the menu to move the stepper through a preset pattern repeatedly. Include both position and velocity commands. (straightforward)
Lab 05: Rangefinders & Steppers
- Rangefinder (40 min)
- Get an SRF-05 Rangefinder to connect to your Arduino. Your rangefinder likely comes with wires already attached according to the following color code:
-
Red : 5V Power for the rangefinder
Orange: Trigger pulse sent from Arduino to rangefinder
Yellow: Echo Pulse sent back by the rangefinder
Black: Ground
- Install your rangefinder program and test it. If you are having trouble, look at the trigger and echo signals with the oscilloscope. That should help you know where the problem lies. When you get it working and displaying the distance as you move an object, give out a shout and show your instructor. Place a copy of your working code into your Note.
- Arrange the rangefinder with a single fixed solid object about a foot away so that it should get a consistent reading. Set up the oscilloscope in dual trace mode to show the trigger pulse and the echo pulse. Take a picture of your dual scope trace.
- Get an SRF-05 Rangefinder to connect to your Arduino. Your rangefinder likely comes with wires already attached according to the following color code:
- Stepper Motor (30 min)
- Get a Tic T500 Stepper Motor Driver and wire it up to your Arduino and an external variable power supply according to the following diagram. To figure out which wires are connected to the same coil, just short them together and see if you feel some extra drag when you turn the shaft. If you do, those two wires are one of the coils. The polarity does not matter and which coil is A or B does not matter (you'll just change which way it turns).
- ATTENTION. Never connect or disconnect motor wires while the
motor power is on. That can easily damage the motor driver. You
should also be sure the motor connections are secure in general so
they don't disconnect accidentally. Whenever you are changing motor
connections, be sure the motor supply is at zero or off or
disconnected or the Tic is De-energized. Once all is safely secure,
then you can set the power supply to 7V

- Pololu Control Center. Connect a USB cable from your computer to the Tic motor driver. On the computer, In the Windows Start Menu, find the Pololu Tic Control Center App (which you previously installed) and start it.
- Settings. Note the three tabs near the top.
- Under the 'Input and motor settings' tab, uncheck the 'Enable command timeout'.
- Under the 'Input and motor settings', set the current limit to 343mA
- Under the 'Advanced settings', check the 'Disable safe start'
- Without using the Arduino (either have no program running or disconnect one of the I2C wires), experiment with the Tic Control Center.
- You can turn on and off the power to the motor coils with the buttons on the lower left to De-energize or Resume. With the motor de-energized, feel how easy it is to turn the shaft. Now Resume to turn the motor coils on again but the motor is still not moving. Now try turning the shaft and feel the jump when it can't maintain position. Increase the power supply to 12 V (don't exceed 12) and try it again. Feel what is meant by 'holding torque'. Return to 7 V.
- Click on the 'Set position' radio button and then try using your mouse to drag the slider back and forth. What fun!
- Change to 'Set velocity' and use the slider again. A new kind of fun. Now get it moving at a constant slow speed and try to stop it with your fingers. Increase the voltage to 12 V and try again. How does this differ from the other electric motors you've tried so far?
- Go back to 'Set Position' mode. Experiment with the following
three settings that are under 'Input and motor settings'
- Max speed. Note that the number you enter here has 4 extra zeros tacked on. So entering 15000000 gets you a speed of 1500 pulses/s
- Max acceleration. Here there are 2 extra zeros.
- Step Mode. Full step, 1/2, 1/4, or 1/8. Be aware that changing this also affects the maximum speed and acceleration because the step size has changed.
- Try the following combinations:
- Full step, Vmax=100.0000 Accel= 1000.00
- Full step, Vmax=5000.0000 Accel= 100.00
- 1/4 step, Vmax=5000.0000 Accel=3000.00
- Full step, Vmax 5000.0000 Accel=3000.00
- With this last setting, try moving the slider very quickly all the way across. Do you see a problem? Try 12 V again. Does that fix it? At higher speeds the motor may not keep up with the pulses. Steppers in general are not meant for high speeds.
- Now leave the settings as in that last example and exit the app, and the controller will keep your last settings when you start to move things with your sketch on the Arduino. There are commands to allow your sketch to change all these settings and more. But it is often quicker to try out different motor settings using the app instead of re-compiling and re-loading a Sketch each time you want to try different settings.
- Get your program running on the Arduino. When you get it working, show your instructor and then include a copy of your code in your note.
- (optional or demo for class) Get your oscilloscope to display the cycle that the windings go through when the motor is turning. ATTENTION: Do not ever connect the probe ground clips (the little black wire) to any motor wires! Only connect the probe tips, one probe on each winding (either end) as shown:
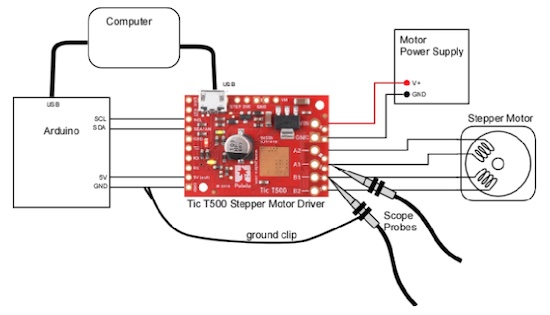
To see the cycle you'll have to get the motor going, trigger the scope and then freeze the display using the run/stop button. You'll have to assume that the other end of each winding always has the opposite polarity so current is always flowing one way or the other. Take a picture of the scope trace.
- The Holy Grail (Putting it all together) (60 min)
This is the ultimate challenge of the lab. Use the rangefinder to control the stepper motor. Design it so that when you move an object closer or further away, that the stepper motor turns as if to move some eyes to follow the object back and forth. This will not be easy but neither is it terribly complicated and I want you to try to figure this one out without too much explicit instruction. Feel free to ask for help and I'll try to guide you to find a solution.
When it works, stand up, give a loud cheer and be recognized! Then show this to your instructor. Put a copy of your code into your report.
If there is time, try to improve the system. How can you get it to be faster? How can you make it smoother?