Lab: Scanning photos and other images
Goals for this lab are for you to experiment with:
- scanning to acquire images,
- creating background images,
- moving things around with CSS layers (they're <div>..</div>'s)
- continuing to get familiar with the Mac OS.
Image and texture of a memory
In this lab you'll scan two items, a photograph (or other image), and
something else which you'll scan to use for texture on your web page.
Save the scan of the photo in a web-ready form (.gif or .jpg file) at a "reasonable"
size (e.g. think of 750 pixels wide as "full screen" for many people.)
Use photoshop to scan some other thing that has a relationship to the
image (which can be about anything, as long as it is not greasy, grimy, dirty
or otherwise a hazard to the health of the scanning beds!) We'll sample this
for texture.
Using DreamWeaver we'll put together a scrapbookish kinda web page with:
- the image on one movable layer.
- some text about the image on another layer, and
- the background image filling the page background, or part of the
page background
Browse to your web page on the webserver to make sure it works. Then hand
in the lab by e-mailing Paul the URL to your short page.
Using the scanners to acquire an image
Acquiring an image
- Start Photoshop -- Go to "Applications folder / Adobe Photoshop CS / Adobe Photoshop"
-
Lots of pixels doesn't always mean great image
quality -- Scanning your picture at a high resolution
(getting lots of pixels) will not magically make sharp a scan
of a blurry photograph. |
"Preview" what's on the scanner bed -- Place the photo/other
graphic on the scanner bed. In Photoshop, "File
| Import > Epson Perfection...". Chose the Professional Mode.
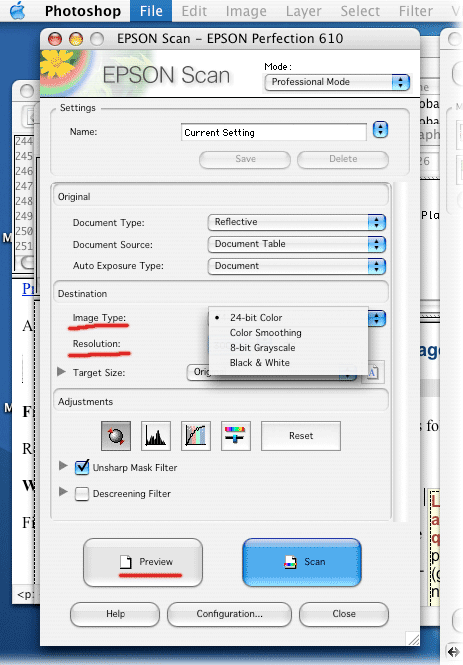
Now, on the dialog box which pops up (below) choose the correct "Image Type" for what you're scanning. You'll probably want "24-bit color" for photographs, or "8-bit grayscale" for black and white images.
Set the resolution to about...
- 75 dpi (dots per inch) for a "quick and dirty" scan to produce an image that looks (on the screen) about the same size as in real life, with no Photoshop editing/re-sizing.
- 150-250 dpi is a general purpose setting if you want to edit
the image a bit, and then save it with fewer pixels to get back to something
that looks about the same size as the original.
- 300 dpi and up only if you want to "blow up" your original, or have a very small, but very high-quality original (e.g. a photographic negative.
Hit the Preview button.

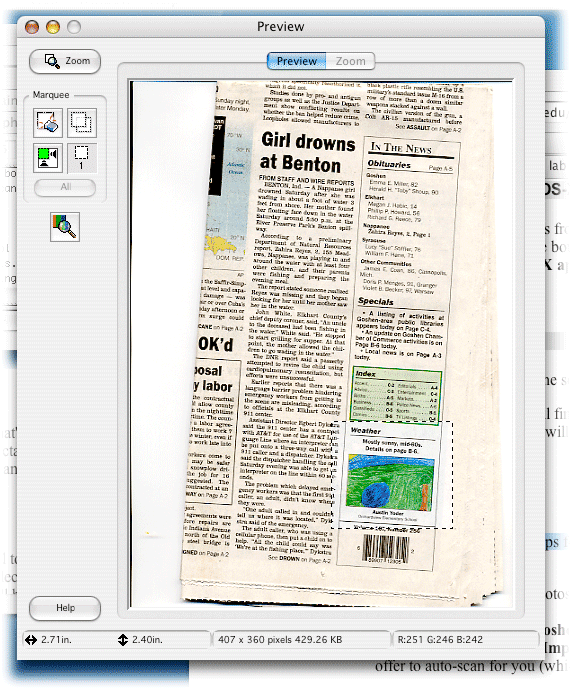
- You'll see a window with a picture of what's on the scanner bed. Use the rectangular marquis to draw a rough rectangular box around the portion of the scanner bed you want to scan, and then hit the Scan button.

- After the scanning process stops, you'll have an image in Photoshop that you can edit/save/etc.
Before you do anything else, you may wish to save an 'original' copy of your scanned image, in .psd or .png format.
Image editing with Photoshop
Photoshop on the Mac works very much
like Photoshop on the PC. Some typical things to do:
- Your image may have been "upside down" or in some
other odd orientation on the scanner bed. Chose "Image
| Rotate canvas" to rectify this.
- Even the big image for this lab should be less than 800 pixels
wide. Do "Image | Resize" if you need to
make your big image a bit smaller.
See Marvin Bartel's
scanning tips for tips about other typical things to do to photos.
Save a copy of your "big" image using "File | Save for Web".
If it's a photograph, use some sort of jpeg option. Save it
in your space on the webserver.
Creating a background image
One of the objects you scanned is going to be sampled for texture: We'll use
Photoshop to create a background "tile" appropriate for filling a
background.
From a scan, in this case, of a newspaper, I took a section of the image, and shrank it down to the approximate size of the tile I'd like to create... here about 150 x 150 pixels.

Without treatment, using this image as a background image, you can see precisely
where the boundaries of the tile are:
We'll blur the edges of one side of the image into the opposite side using
Photoshop's "Filter | Pattern Maker". Set the offfset
to between 5 and 20 %, and then try various options for smoothness
and Sample detail. Hit generate. You can try several variations,
and when you're done your image will be replaced with the new tile. (Aren't
you glad you saved an original??)
For use in background images you often want to reduce the contrast and then
make the whole image a good deal lighter or a good deal darker, so that details
in the background image do not interfere with readability of the text and other
things you are putting on top of the image. Go to "Image | Adjustments
| Brightness/contrast"
I finally ended up with this background tile:

Make sure you save your background tile on the webserver, so that when you construct your web page, visitors will have access to the image.
| Black text on top of my newspaper-ish background. |
Other typical things to do
Fade the image out--one way to do this is to dial the layer opacity down.
You can add a new layer behind the image, use the paintbucket to fill the new layer, and then with your image only partially opaque, you get this kind of effect [crumpled paper, with light red filling behind] .
Using DreamWeaver to construct the lab page for today
You can create your web page here in the Mac Lab: Start up DreamWeaver from
the OS-X apps folder. Then, start a new page, and save it in the same folder
(on the webserver) where you saved your thumbnail and big image. Remember to
save your web page before you insert any images into it.
To insert a layer choose "Insert | Layout Objects | Layer".
You'll see a rectangle on the screen with a handle on the top-left corner. Some
things you can do with layers:
- Move the layer by grabbing the handle, dragging and dropping.
- Resize the layer by grabbing the lower-right corner and dragging.
- Insert text or images: Just click once in the layer and type, or
else "Insert | Image".
You can also format a layer using CSS: Create a class, and then attach
the class to the <div> tag of the layer. You
can certainly get at the typography in the layer this way. Some other layer-specific
things you may want to try:
- On the box menu of your class, you can mess with the padding (akin
to "cellpadding" in a table cell).
- On the border menu you can turn off/on a layer border, and set other
characteristics.
- On the positioning menu, you can set the z-index, which determines
which layer is on top (if several layers overlap).
To insert the background image into your page you can use CSS to change
the style for the <body> tag, or go to "Modify
| Page Properties".
Before you leave the lab, make sure you log out and remember to take
your items off the scanner bed.
