 The
latest version of Photoshop has added two new selection tools
The
latest version of Photoshop has added two new selection toolsIt is useful to be able to do some collage work in Photoshop as a way of digital 'sketching'.
 pp 81-86;
  pp. 138-140, Type graphics
Go to "Preferences | Units & Rulers" and choose to show rulers and type in pixels rather than points.
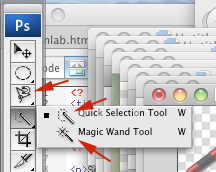
The
latest version of Photoshop has added two new selection tools
You can also use...
Hold the (left) mouse button down on any Photoshop tool to show or select related tools.
Here's a photo
of Ben and George
W. to practice on...
The most important key combination in Photoshop is probably Ctrl-Z which means Undo!
Once you've made an initial selection, you may wish to add to it, or subtract from your selection.
Use the Select menu to
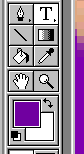
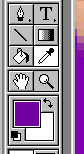 Many tools use the foreground or background colors (at left, purple, and white respectively). Clicking on the foreground (or background) color box brings up a color picker that can be used to set colors. If you want a color that already exists in the image you're editing, select the eyedropper tool. Left-click on a color to select that color as the foreground color. Right-click to select as background color.
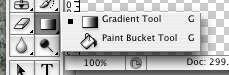 Hold the mouse button down on the paint bucket/gradient tool to see both options. The paint bucket tool lets you fill part of your image with the currently selected foreground color. You'll fill pixels the same color as the one you click on (plus/minus the "tolerance" that you enter) with the foreground color.
![]() One use of the gradient tool: You can
One use of the gradient tool: You can ![]() create a picture with a transition from the foreground color to transparent by choosing the "foreground to transparent" option, and a linear gradient (see right). The transition between the two will happen from the point at which you press your mouse down till the place you let it go.
create a picture with a transition from the foreground color to transparent by choosing the "foreground to transparent" option, and a linear gradient (see right). The transition between the two will happen from the point at which you press your mouse down till the place you let it go.
For tiling background images, you want to make sure the gradient is precisely up and down (or horizontal). Hold the shift key down to lock in the direction to precisely horizontal or vertical.
PC: Hit the PrintScreen key to put a snapshot of the entire computer screen onto the clipboard.
Mac: Shift-Control-Apple-4 will turn the cursor into a cross-hair pointer, and you can drag to define a rectangle which ends up on the clipboard when you release your mouse.
With either one, you'll switch to Photoshop, select "File | New", accept the suggested dimensions, and then paste from the clipboard.
You should be able to use the layers window to: